
Going the Distance
Remote STEM teaching has to keep up with the ‘why is it so?!’ moments – big and small. AV Asia Pacific senior writer and AVDEC consultant Derek Powell explains the design and why it won an AVIA.
Text:/ Derek Powell
The University of New England has always specialised in distance education; a style of teaching that has seen, and continues to see, massive innovation as it migrates to an online environment. With more than 18,000 off-campus students, UNE is ranked No.1 by Online Study Australia in its national list of Australia’s best online universities.That position is hard won and to continue its mastery in this space UNE launched the Virtual Institute for Teaching & Learning (UNE VITAL) in 2015. UNE VITAL is tasked with researching better ways to deliver online education
STEMMEd DELIVERY
Delivering Science, Technology, Engineering, Mathematics, Medicine and Education (STEMMEd) courses online is particularly challenging; especially the need to illustrate practical science experiments. It was in response to this need that the School of Education commissioned a best-practice facility; specifically to deliver science and technology subjects interactively to remote students. This marked the start of our AVIA award-winning project.
Two nondescript tutorial rooms were identified for renovation and Head of School, Professor Steve Tobias, called in Kesha Riley from the University’s Information Technology Department, alongside audiovisual consultants AVDEC, to create a STEMMEd ‘distance education laboratory’.
CLASSROOM STUDIO
The starting point for the design of an educational facility is to understand the kind of teaching (universities use the word ‘pedagogy’) that will take place in the space. In this case, as the deputy Head of School, Associate Professor Judy Miller explained, we were creating a television studio as much as a classroom. Many of the activities within the new classroom would include practical experiments and the facility needed to transmit the activities undertaken by the class in the room to remote students so they could see, understand, and be involved with the experiment. To assist, A/Prof Miller drew up a number of diagrams and floorplans for typical teaching scenarios.
Part of the challenge was that these experiments could be small scale, such as a chemical reaction in a test tube, or much larger, such as a physics experiment that involved rolling bowling balls from one side of the room to the other. This would be straightforward for a crew in a television studio, but we needed to create a system that was familiar to, and easily operated by, teachers — rather than media specialists. And then there was the question of a somewhat limited budget!
Kesha Riley, UNE’s Technical Manager – Audio Visual Services, has worked with me (in my role as a Senior Consultant with AVDEC) for three years. Together we had reviewed UNE’s audiovisual standards and carried out a program of upgrades to the major teaching spaces. Kesha was also intimately familiar with the equipment and practices currently used by the academics in the school — vital information that we put to good use. We started by mapping out a set of guidelines for the technology to be used in the new space. Whatever we came up with had to have an acceptable learning curve for the users, it needed to have low ongoing running costs and be easily maintainable in the event of faults.
WHAT THE JUDGES SAID
Best Application of AV in Education – $100k & $500k
AVDEC, for the University of New England’s VITAL STEMMEd Space
By design, AVIA award-winning projects don’t need to have massive multi-million dollar budgets. The awards set out to recognise innovation in AV and specifically look for both large and small-scale projects where good ideas are employed to meet the client’s brief in innovative ways.
AVDEC’s flexible, well-designed and easy-to-operate solution impressed both the client and the judging panel with the quality of the design and the implementation of this pilot project. The judges were also impressed with the level of client satisfaction and enthusiasm about the value of this project as a template for distance education over the web.

BACKS TO THE WALL
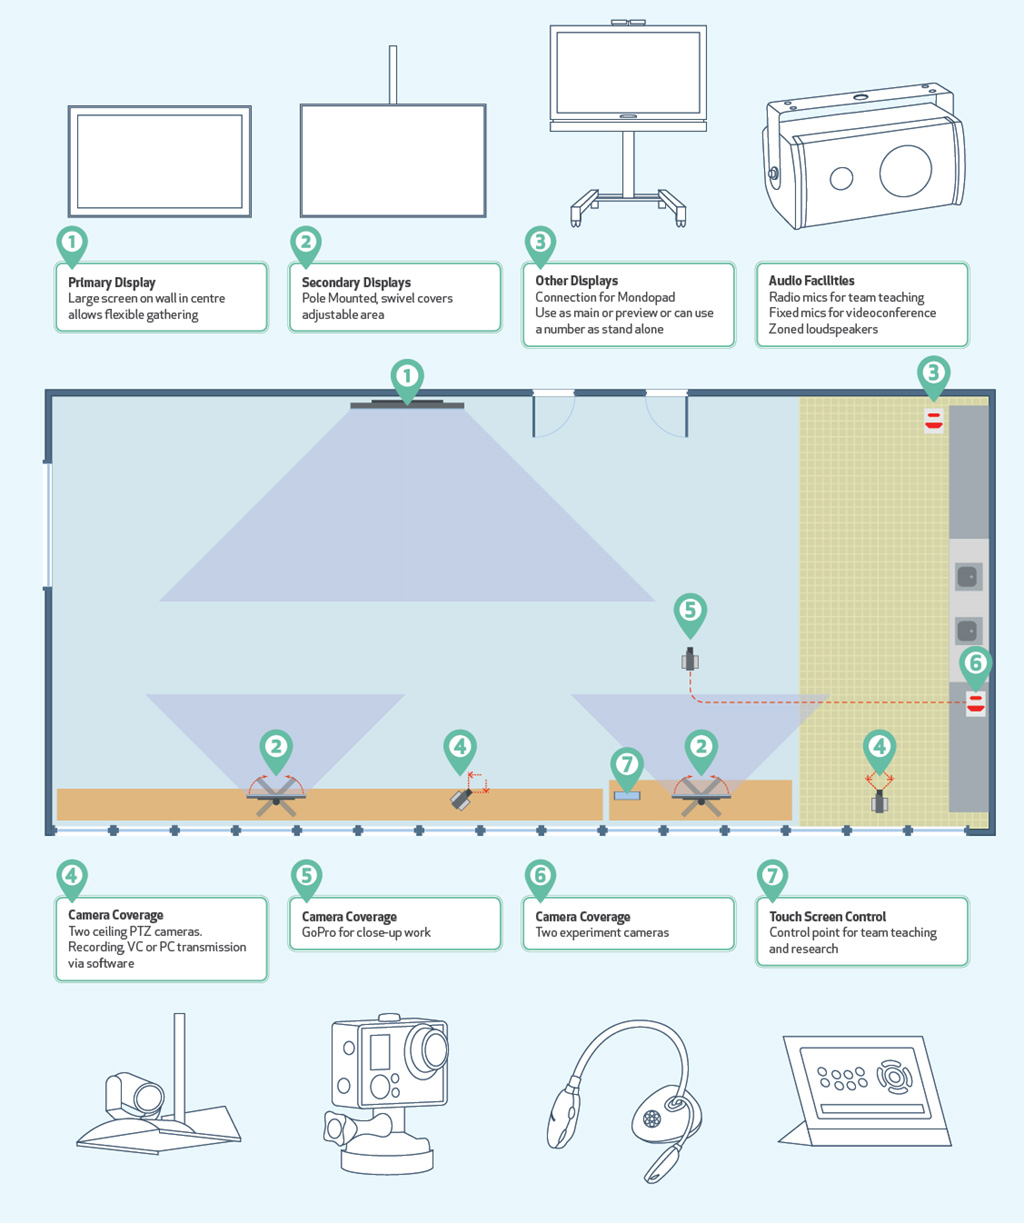
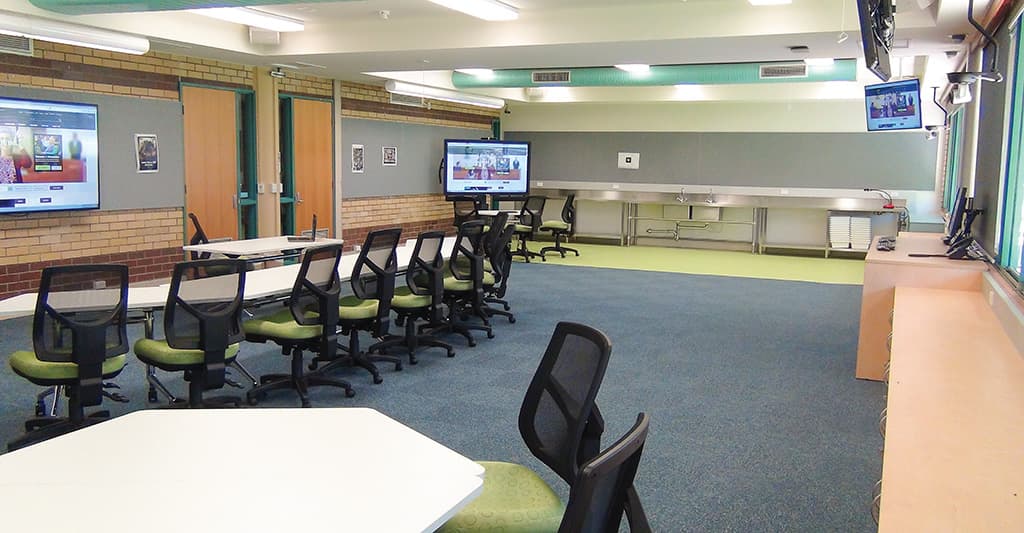
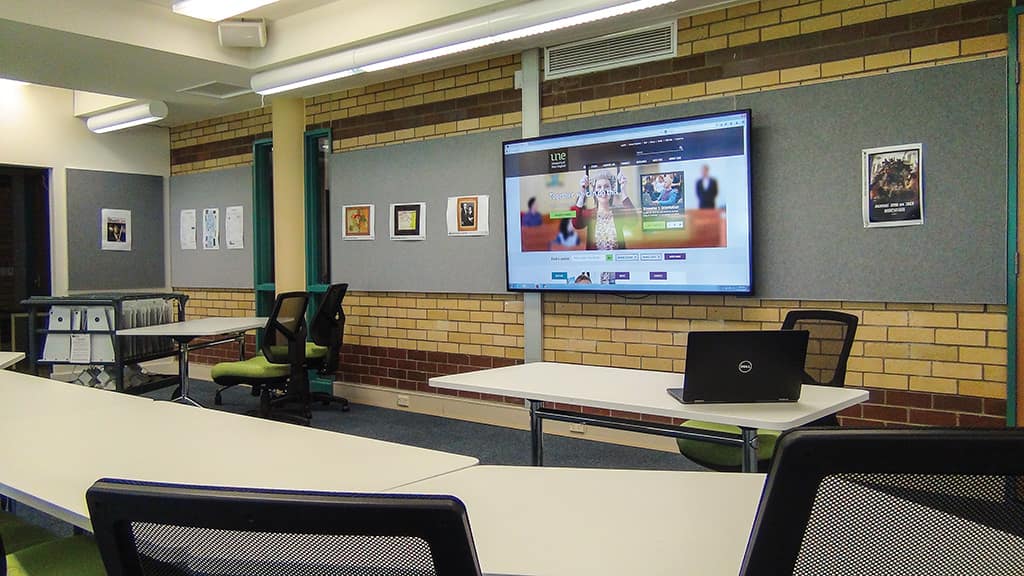
Next, we reviewed the strengths and weaknesses of the chosen space. One side was lined with windows. On the plus side, the windows ensured a light filled space but could also provide contrasty, backlit video if we weren’t careful about camera placement. With the light in mind, we settled on a large bright LCD monitor as the main display. We kept the display wall and the main presentation locations opposite the windows. As there was a row of storage cabinets under the windows, we commandeered space in the centre of the wall for two, half-height equipment racks with a broad shelf above it on which to mount a control station.
To avoid backlighting, we mounted the two videoconference cameras on the window side, which allows for shooting away from the light. Camera locations were confirmed by spending time with a stills camera, taking shots of room zones we knew we needed to cover with the video cameras. It soon became apparent that mounting the cameras on the ceiling produced a ‘helicopter’ view of activities that resulted in unsuitable eyelines. Because of the windows, however, there wasn’t any wall space to mount PTZ cameras. The compromise was to pole mount our cameras above the benchtops at standing eye height, using custom manufactured ceiling pole mounts.
These cameras would be used for recording activities, but also (and crucially) for live video and web conferencing of the activities to remote students. To provide the correct eyelines for two-way conferencing we made sure the monitors that would show the ‘far-end’ view were located close to the cameras. These were fixed on swivel mounts so they could be easily adjusted to be visible regardless of where the teachers were in the space. The monitors were specified to be bright (450 nit) to allow for easier viewing against the light from adjacent windows.
EXPERIMENTAL AV
To film the experiments, we decided on two flexible and easy-to-use cameras. The first was the familiar ‘Ladybug’ style of document camera. Its bendable gooseneck head could be twisted to cover anything from benchtop experiments to test tube reactions. Larger-scale practical experiments on the vinyl floor area would be covered in the wide shot by the nearest PTZ camera. But we also wanted a close-up option. For this we decided to use a GoPro since it had higher resolution, good high or low light performance, and was small enough to be handheld whenever it was needed.
All the switching between cameras and control of the PTZ camera presets was handled by a familiar interface on a 10-inch AMX touchpanel. To make it easy for teachers to be sure they had good shots of the action, any camera could be switched to the large 48-inch swivelling confidence monitors, clearly viewable from anywhere in the room.
CLIENT FEEDBACK
Sue Gregory (Chair – Research, School of Education) UNE: Thanks to the diligence in the planning stage, the UNE-VITAL STEMMEd lab is a relatively easy to use technological environment. It has already been utilised extensively by academics, as well as preservice teachers and in-service teachers. Here is just one example of what the STEMMEd lab is capable of: The labs have been set up so that several groups can link to each other from afar, at the same time. Recently, a group of pre-service teachers were undertaking a workshop with a lecturer. They were using iPads and a special app while linked to a classroom where a teacher was giving a geography lesson with a class of primary school students. In that classroom were other pre-service and in-service teachers being beamed in from a Pacific Island who were contributing to the lesson. Altogether, there were two groups of pre-service teachers from different locations; two groups of in-service teachers from different locations; one lecturer and one group of primary school students, all in the one lesson! This would be a difficult feat indeed if it wasn’t for the technology in our new Lab. This lesson was also being viewed by an audience (physically present) of approximately 50 people, demonstrating the kind of innovative remote teaching the technology makes possible.
TEACHING TWO WAY
All would be lost, though, if we couldn’t provide good, echo-free, two-way audio between the classroom and the remote students. Audio problems are the most common reason that video conference teaching sessions aren’t effective, so we invested a great deal of design time to devise bulletproof coverage for any possible scenario. Shure Microflex wireless microphones formed the backbone of the system. Two Shure radio lapel mics were chosen to cover the teacher and demonstrator, along with a handheld mic – that was the easy part. To pick up discussions at group tables, we settled on three of the new Shure Microflex wireless boundary microphones while the rest of the space was covered by four ceiling-mounted Audix wired mics. Rather than conventional ceiling speakers, we chose to use ten RMU105 speakers from the Bose RoomMatch range. Wired in five zones, these produced excellent, controlled coverage patterns along with great articulation of spoken word sources. A Biamp Tesira Forte DSP provided horsepower for mixing, EQ and the all-important echo suppression duties.
The care and effort invested by our integrator, Videopro, really made this AV design work, especially the time invested in tuning the audio system. During testing, we set up a three-way test scenario from our new space to an existing VC room and also to a typical student laptop in another room. We spent several hours testing from every part of the space and fine tuning both the speaker and microphone levels until we had a system that worked everywhere without needing constant volume adjustments.
IT JUST WORKS
All the effort in planning and testing really paid off when it came time for the initial training sessions with the academic staff. They instantly understood the familiar touchpanel interface and were already at home with using the document camera to show small-scale images. Even using the GoPro proved intuitive as they could hand-hold the camera and easily see the images on the confidence monitors.
The best plaudits came when the teachers realised that the audio was genuinely ‘plug ’n’ play’. Simply clipping on a lapel mic and placing boundary mics at any of the group tables instantly facilitated natural real-time Q&A interactions for everyone. The sense of relief amongst the teachers was palpable as they realised “it just works!”
TEAM DETAILS
UNE:
Kesha Riley, Technical Manager – Audio Visual Services
Information Technology Directorate
Angie Hendrick, Associate Director IT Client Services,
Information Technology Directorate
Lorraine Jenkyn, Project Manager – Information Technology Directorate
Craig Dussart, Project Manager – Facilities Management Services
Consultant:
Derek Powell, AVDEC
Integrator:
Videopro
Project Manager: Peter Tattersall
Commissioning: Darran Cowling, Cameron McGuffie, Craig Upton
Regional General Manager: Graham Cherry
EQUIPMENT LIST: VIDEO
Main Monitor: Samsung DM-82D 82-inch Monitor
Ceiling Mounted Monitors: Samsung DH-48D 48-inch Monitor
Foyer Wall Mount Monitor: Samsung DH-48D 48-inch Monitor
Preview Monitor: Samsung S27C45KBS 27-inch Preview Monitor
Wireless Connection Appliance (Laptop): Extron ShareLink 200N
Wireless Connection Appliance (Apple): Apple MD199XA Apple TV
Experiment Camera Systems: Lumens DC-192 Document Camera
GoPro Hero 4 / Music Ultra HD 4K Camera
Kramer VP410 Scaler
Room Controller/Switcher: AMX Enova DGX 800 Enclosure
Digital Transmitter/Receivers: AMX DXLink
Recorder: Echo 360 SafeCapture HD Content Recorder
Video Conferencing System:
Polycom Group 700 Video Conferencing System
Vaddio RoboSHOT 12 PTZ Camera System
Vaddio EZ Camera Control Adaptor
EQUIPMENT LIST: AUDIO
Microphone – Lapel Wiresless: Shure MXW1 Bodypack Transmitter
Microphone – Handheld Wiresless: Shure MXW2 Handheld Transmitter (w/SM86)
Microphone – Boundary Effect: Shure MX690-L4 Wireless Boundary Microphone
Receiver & Network Interface: Shure MXWAPT8 Access Point Transceiver
Shure MXWANI8 Audio Network Interface
Microphone – Question Mics: Audix M55W Ceiling Microphones
Audio DSP/Router: Biamp Tesira Forte Digital Signal Processor
Biamp 4-channel Input Expander Box w/AEC
Power Amplification: Powersoft PWS1204 Amplifier
Loudspeakers: Bose RMU105 RoomMatch Loudspeaker
Hearing Assistance: Williams Sound WIRTX75 Infrared Transmitter
EQUIPMENT LIST: CONTROL
Programmable Master: AMX Enova DGX-800
Interfaces: AMX EXB-COM2 ICSLan Serial Interface
Control Panel: AMX MST-1001 Touch Control Panel
Equipment Racks: Middle Atlantic ERK Series







RESPONSES